We will be using the Effects/Artists Effects/Balls and bubbles for the highlights on the body. You'll need to download these from HERE and put them in their appropriate folders in your My PsP Files folder (located under your My Documents...NOT...inside your PsP program). We will be using the "tp_BigClear" one.
You will need the gold texture swatch for the text sculpturing, the MD-Gold gradient for the belt and both Kaleigh and Coventry Garden fonts which you can download HERE.
Put the gold texture swatch into your Texture folder. And the MD-Gold gradient in your Gradient folder
I also would like you to set up your grid before we start our project. To do this bring up a vector canvas 400 x 400 and right click on the top of your canvas and choose Grid.
NOTE: You can change the size and color of your grid lines by right clicking again on the top of your canvas and choose "Change Grid, Guide and Snap Properties".
Now turn off your grid and let's begin.
Remember to SAVE OFTEN!
1. If you closed out your first canvas, bring up another vector canvas 400 x 400 and in your Material Pallet set both fore and background to this color: #85312e. ![]() (just copy and paste that color # into your Material Pallet).
(just copy and paste that color # into your Material Pallet).
Now, for the moment, Null your background. I think it's easier to see the shape you'll be creating when it's only a line.
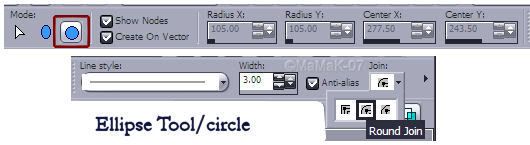
Get your Ellipse Tool
...and use these settings:
Now draw out a circle approximately this size:
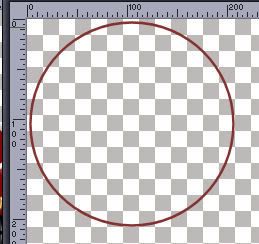
When you draw out your circle, keep in mind the length of whatever text you are going to be placing across the belly. You want to have enough room.![]()
2. Go UP to Objects/Align/Center in canvas.
At this point, you have a circle with four nodes showing. The only thing you can do with them, however, is push and pull on them to change the shape of your circle into an oval or a larger circle. However, we want to make points on the top and the bottom of the circle and the way you do that is to:
a. right click on your canvas and choose "Convert to path". This action changes your nodes to being "editable". Which is what we'll do now.
b. Get your Pen Tool and Right click on the top node and choose/Edit Nodes/cusp. You'll see that you now have "handles" on your top node.
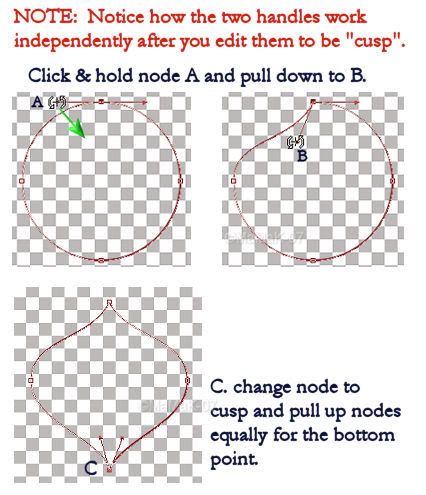
Here's where we take some of the mystery out of the difference of the nodes. We'll just talk about what function the "cusp" has which is the ability to change the shape and direction of a line independently from each side of the node point.
At this point in the TuT, I want you to read ahead a bit so you can see what we are going to be doing. Read and look past the Grid example. I'm making the next line green so you can easily come back up to where you need to begin again. ![]()
Now...grab a hold of the left side of the handle and pull it down. See how only that one side moves?
OK...now I want you to Right click on the top of your canvas and choose Grid. We're doing this so that you can move your cusp lines equally by "eye-balling" where they should be. ...and pull the right side of the handle down to match the left:

Then go ahead and Right click on the bottom node and change it to cusp and pull the handles up. See example C below:
You can now Right click on the top of your canvas and chose Grid to turn it off.
3. When you have your shape as you want it, go over to your Material Pallet and un-Null your background color. Your shape will fill in with the same red. Now Right click on your canvas and choose Apply.
![]() TIP 1: As long as your shape is still in vector form, you can change the shape of it by going over to your Layer Pallet and clicking on the little + and opening up the vector layer. Left click on the desired path in there and your nodes will re-appear. If they don't appear, go UP to your Pen Tool and click on that and then click on the Edit:
TIP 1: As long as your shape is still in vector form, you can change the shape of it by going over to your Layer Pallet and clicking on the little + and opening up the vector layer. Left click on the desired path in there and your nodes will re-appear. If they don't appear, go UP to your Pen Tool and click on that and then click on the Edit:  and then Left click on the desired line on your canvas or on the inside path vector layer in your Layer Pallet.
![]() TIP 2: One of the really cooli-o things about vectors is while in vector form, any of your "paths" you create which will show up inside of each Vector Layer in your Layer Pallet can be edited as I've shown above. And also, by double left clicking on the desired path. This Vector Properties screen will come up and you can change all kinds of things here after the fact:
TIP 2: One of the really cooli-o things about vectors is while in vector form, any of your "paths" you create which will show up inside of each Vector Layer in your Layer Pallet can be edited as I've shown above. And also, by double left clicking on the desired path. This Vector Properties screen will come up and you can change all kinds of things here after the fact:

![]() TIP 3: Often while creating a complex project and before I do something drastic to it, I'll go hold my Shift-key down and tap d to make a a duplicate copy of it and set that copy aside on my workspace. That way if I screw up the one I'm working on beyond reasonable repair, I always have my dup copy to fall back on. REMEMBER, however, that your history pallet will only reflect that it is dup'd. The History Pallet will NOT bring over all the steps you've done on your project with the copy. For that reason, I usually continue on working on my dup'd copy instead of my original.
TIP 3: Often while creating a complex project and before I do something drastic to it, I'll go hold my Shift-key down and tap d to make a a duplicate copy of it and set that copy aside on my workspace. That way if I screw up the one I'm working on beyond reasonable repair, I always have my dup copy to fall back on. REMEMBER, however, that your history pallet will only reflect that it is dup'd. The History Pallet will NOT bring over all the steps you've done on your project with the copy. For that reason, I usually continue on working on my dup'd copy instead of my original.
OK...'nuff TIPS for now.
4. Be sure that you have your shape as you like it 'cause now we're going to go over to your Layer Pallet and Right click on the Vector Layer and "convert to raster". We will no longer beable to change the shape unless you've dup'd it. ![]()
5. Get your Magic Wand tool, click outside the red ball and go UP to Selections and Invert. You will have the little marching ants around your ball. We need to do this so that the Effects will know in what dimension you want them applied.
7. We will apply the highlights effects by going UP to Effects/Artists Effects/Balls and Bubbles. The option screen will pop up and at the very top, click the Presets: drop-down button and find and choose "tp_BigClear".
a. The first of the 4 tabs is Shape and tick off "Single ball or bubble" and "Maximum possible size":
b. Next tab is Surface and your settings are:
c. Maps is next and we won't be using the Bump or Envirnoments for this project. Make sure both options are NOT ticked off.
~Apply the highlights~
1. Now with your last tab, Illumination, selected, we are going to apply two different Lights to our Santa ball.
Here are your 1st settings to put in Light 1:
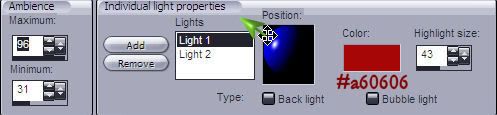
First Color is: #a60606
Please note that there will be two different shades of red one for each light...a lighter red for the top one and darker shade for the second one. Also the Highlight size and Position are different.
2. To change the position of the highlight, see below:
There is no position co-ordinates that I am aware of so you'll have to eye-ball it and use your best judgement. You can always back out of it and try again if you're not at first pleased with your results.
3. Click on Add to add the 2nd light and apply these settings:
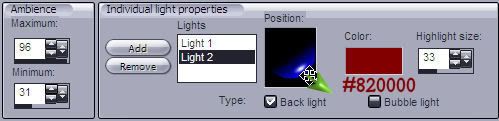
Light 2 color is: #820000
And this is the best example I can give you on where to place the 2nd highlight. Pull it down and to the right outside of the box. Look up at your option screen in the right hand panel and you can see how it's going to look.
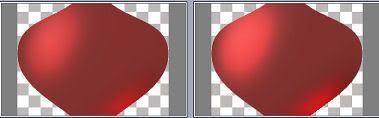
Hopefully, it will look something like this:
4. Click OK and go UP to Selections/None.
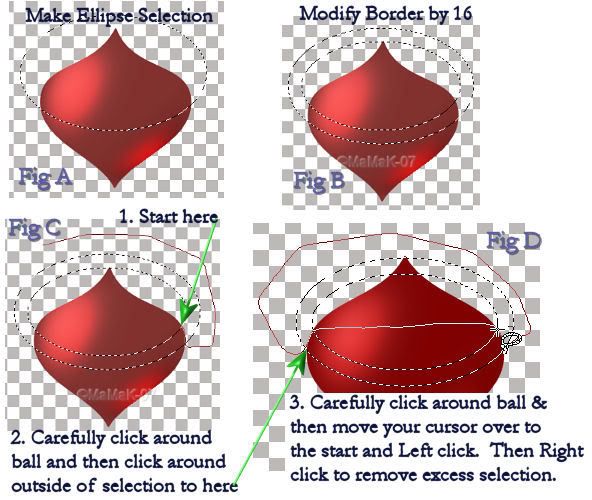
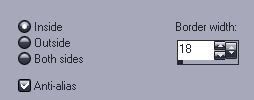
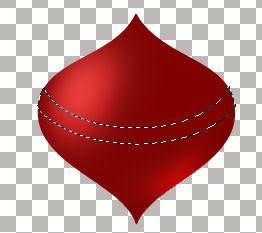
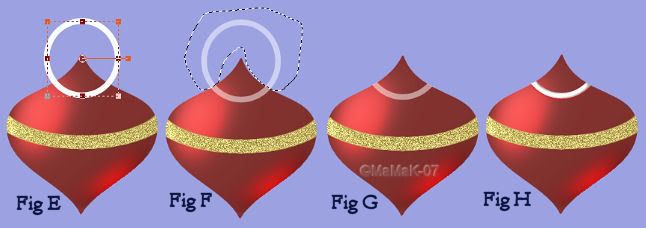
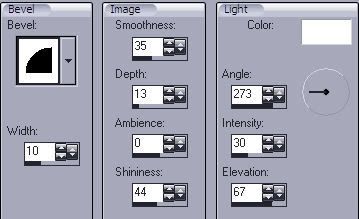
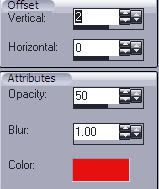
MAKE BELT This next step is a little complicated, but you can do it! Just read carefully and take it one step at a time. I'm hopeful that my graphics will be clear enough for you to easily understand. I've lumped them all into one place and give instructions as I go along referring back to them in each figure. 1. Add a new raster layer and get your Selection Tool/Ellipse. Center your cursor on the ball and move it up some. Then click and draw out to the right. The ellipse shape will come out of both side of your cursor. I want you to try and fit the bottom of the ellipse selection to the contours of the belly ball part - see Fig A. When you are satisfied with the selection shape, go back UP to Selections/Edit and the red will disappear and you'll have your marching ants again. * * * * * 2. Next go UP to Selections/Modify/Select Selection Borders and apply these settings: Your project will now look like ^ Fig B. I know this setting says 18 and Fig B says 16, but use your own judgement in the width of your belt. (I'm not changing the graphic now! LoL) Here's where it gets a bit tricky, but just follow the steps and you can do this! 3. Next we are going to remove the excess selections by getting your Freehand Selection Tool (the one that looks like a lasso) and use these settings: 4. Now in your Layer Pallet, Left click on the ball layer to highlight it. We want to use it so that the lasso can select around the edge of the ball. Looking at Fig C, and because we selected "Edge Seeker" it will seek the edge of the ball,..left click in teeny steps around the edge of the ball. Then you can make larger click outside and around the ellipse selections. See in Fig C the red line going around? That's my clickings. Continue clicking around until you get to the opposite bottom edge of the ellipse and carefully click around and up that side of the ball. Then lift up your cursor and pull it over to the starting point, which you can see in Fig D.,and left click exactly on that beginningpoint. Then Right click to remove the excess. Isn't that neat? If it doesn't look right and the edges are not right up to the edge of the ball, undo and try again. It's kinda important that the belt fit the ball. DO NOT TURN OFF YOUR SELECTION ANTS. 5. In your Layer Pallet, left click to select the new raster layer. Then in your Material Pallet, bring up your gold gradient and flood fill the belt. 6. Duplicate the belt layer twice. You have 3 layers of belt now w/marching ants. 7. Double Left click on each belt layer and name it Belt 1, Belt 2 and Belt 3 respectively. 8. On Belt 1, apply DSB flux noise at Mix/49. On Belt 2 and 3, apply the same only click the little Mix dot each time to change the noise. 9. Go UP to Selections/None WHITE COLLAR 1. Set your Material Pallet foreground White and background Null. 2. Get your Ellipse Tool with a line width of 8 and draw out a circle over the top of your ball for the collar. Then click on the Object Tool and center your collar See Fig E. 3. Go over to your Layer Pallet and Right click and "convert to raster". And then reduce the opacity to about 50% so you can see the ball edge under it. And then Left click on the ball layer to make it active. 4. Get your Selection Tool (lasso) w/Mode=Add, Type=Edge Seeker and go around the ball edges and part of the collar See Fig F. 5. In your Layer Pallet, Left click on the Collar layer to make it active and then Right click on top of the canvas and choose cut. Your project should look like Fig G. 5. Go over to your Layer Pallet and increase the opacity back to 100% and apply a bevel and a shadow using these settings: #e61010 = red for collar 6. Double left click on the collar layer and name it "collar". ~BALL HOLE~ 1. Get your Selection Tool w/Selection Type= Ellipse / Mode= Add draw out a little oval in the top of your ball. 2. Right click on the top of your canvas and choose Cut. This puts the little hole in there. 3. We'll add some contour to the hole. Go UP to Selections/Modify/Select Selection Borders and use: Border width=3 and tick off Outside. See Fig K ^ above. 4. Add this bevel w/this color #da0f0f: ![]() TIP: You can Edit the shape of your Selections at any time by going UP to Selections/Edit. Your selection area will turn red and have a bounding box around it (see Example below) with which you can push and pull your selection shape into how you want it. Best to wait to do this Edit/Selections thing for this project after you have completed Step 2 below and have two selections going.
TIP: You can Edit the shape of your Selections at any time by going UP to Selections/Edit. Your selection area will turn red and have a bounding box around it (see Example below) with which you can push and pull your selection shape into how you want it. Best to wait to do this Edit/Selections thing for this project after you have completed Step 2 below and have two selections going. 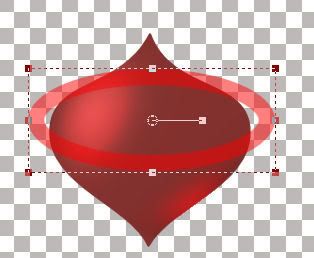
![]()
![]()
![]()
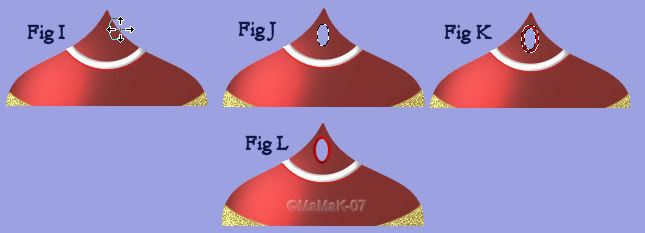
![]() TIP 4: Once your selection oval is created, you can move your selection around by clicking on the Move Tool and then Right click and hold down on the selection and slide it into place. See Fig I.
TIP 4: Once your selection oval is created, you can move your selection around by clicking on the Move Tool and then Right click and hold down on the selection and slide it into place. See Fig I.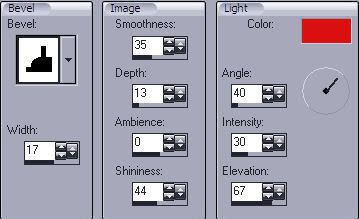
~BELT BUCKLE~
1. Get your Pen Tool with a width of 8 and go over to your Material Pallet and set your foreground to black.
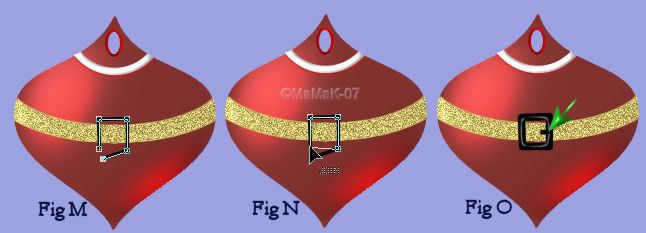
2. Hold down your Shift key and click a square shape w/4 clicks. On the fifth click, let go of the Shift key and click at an angle as shown in Fig M.
3. Now click and hold on the fifth node and shove it up to the 1st node until you see the word "join" and let go. See Fig N ^ above. Right click on your canvas and Apply.
Remember you can make changes to it by using your Object Tool or by double Left clicking on the "path" inside your Vector Layer in your Layer Pallet.
4. Go over to your Layer Pallet and Right click on the Vector Layer and choose "change to raster".
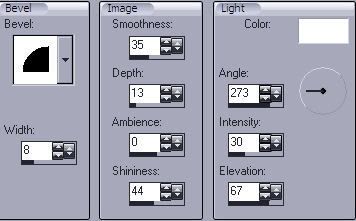
5. Apply this bevel:
6. Reduce your line width to 5 and add the little thing indicated in Fig O by the green arrow. I don't know what you call that little stick-thing! LoL
7. Now go over to your Layer Pallet and Merge down the stick-thing to the Buckle and name your layer "buckle".
~MERRY CHRISTMAS~
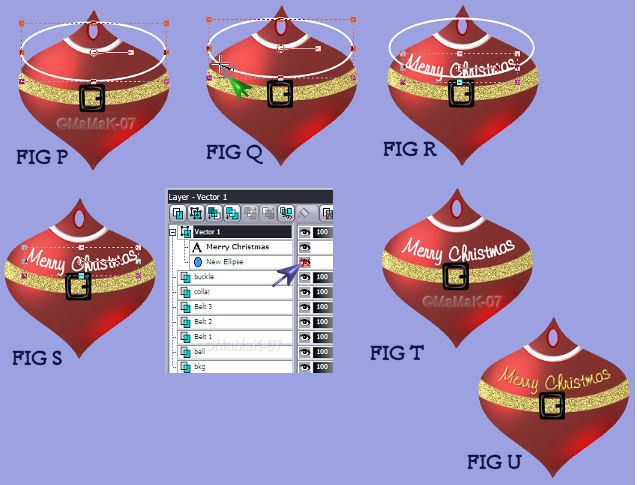
1. Get your Ellipse Tool with the foreground set to white and background Null in your Material Pallet.
2. Draw out an oval that fits the contours of your ball. See Fig P When you have the size you want your oval, go UP to Image/Flip. It will move your oval down over the ball. Get your Object Tool and reposition the oval where you want it.
![]() NOTE: We are flipping the vector oval we created so that the text we are going to type will curve in the bottom of the oval instead of on top of the oval.
NOTE: We are flipping the vector oval we created so that the text we are going to type will curve in the bottom of the oval instead of on top of the oval.
3. Get your Text Tool w/Kaleigh font at size 22/stroke 1. Sett your Material Pallet fore and background to white and hover over the bottom part of the oval until you see the rocker...See Fig Q where the green arrow is above.
4. Type out Merry Christmas
5. Go over to the Layer Pallet and x-out the oval vector as shown in
Fig S purple arrow above.
6. Now right click on the Vector layer and choose "convert to raster".
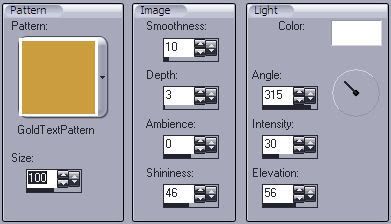
7. Go UP to Effects/Texture Effects/Sculpture and apply these settings:
8. Apply this bevel:

~Merge Layers~
Now we want to Merge Down the layers to get our ball all together.
1. Go over to your layer pallet and x-out any background you may have on it; the buckle and all 3 belt layers:

2. Merge visible the "Merry Christmas", "collar" and "ball" layers and then double Left click on the merged layer and rename that layer "ball". Then duplicate that "ball" layer twice.
3. In your Layer Pallet, click and hold one copy of the "ball" layer and move it under the first "Belt 1" layer. Then move the 2nd ball layer under the 2nd belt layer. Do the same with the 3rd ball and belt layer:
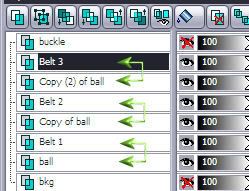
4. Now Right click on the 3rd Belt layer and chose Merge/down. This attaches the one belt to one ball layer.
Do the same to the next set of ball & belt layers and again for the 3rd two layers. You now have 3 merged layers of a ball w/a belt attached to it.
5. Duplicate the "buckle" layer twice and move and merge down the buckle to the ball w/belt layer as just described.
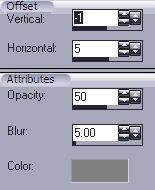
6. Put a shadow on each layer with these settings:
~MAKE YOUR NAME~
1. With your Material Pallet fore and background white, get your Text Tool and use these settings:
![]()
2. One of the peculiar things about the Coventry Garden font is that only the Capital letters have the swing arm attached to it. So taking advantage of this fact, type all but one of your letters in your in lower case. Make the one letter you want to have your Santa Ball swing from in Caps.
As you can see from Fig V below, the 2nd S is touching the ball and we don't want that. So get your Object Tool and move your name up so that the other letters do not touch the ball, see Fig W.
3. Next go over to your Layer Pallet and click on the + on the Vector Layer which will open it up. Now Left click on your name (keSsy in Fig W below) to select it and then Right click and chose/Convert Text to Curves/As Character Shapes. Now you can manipulate each letter independently from the others.
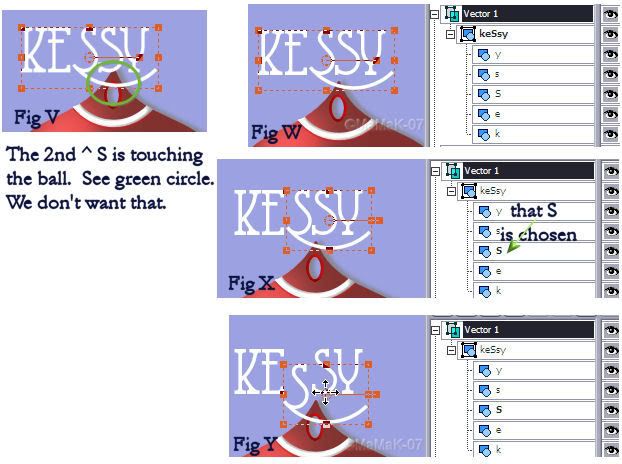
4. In your Layer Pallet, Left click on the swing letter to select it and then go get your Object Tool and move it down into position as shown in Fig Y above.
![]() NOTE: You want the swing part of it to look like it's going to go through the ball hole near the top of the hole.
NOTE: You want the swing part of it to look like it's going to go through the ball hole near the top of the hole.
5. When you have your swing letter in position, Left click on the Vector Layer (the one highlighted in black as shown above) and then Right click on that layer and chose/convert to raster layer.
6. Now apply the same gold sculpture and bevel to your name as you did to the Merry Christmas. You should still have them set up in your PsP. You might want to save these settings in your presets for future use on other projects. ![]()
Your project should like Fig Z below:
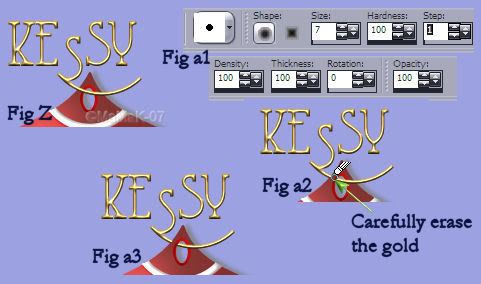
7. Now we want to erase the gold part of the swing arm so it will look like it's going through the ball hole. I put up the settings I used for my erasure in Fig a1 above.
Fig a2 shows how I carefully tapped a couple of times on the gold over the ball until it looked like Fig a3.
8. Apply the same shadow to your text as you did to your ball.
9. And dup your name twice and move one copy of your name over each layer of the ball and use the same "merge down" technique as we did before:
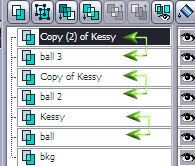
We are basically done! The "bkg" layer at the bottom of my last screen shot was there for example purposes only. If you put a colored background on your project so you could see to work better, do NOT merge it with your other Santa Balls (unless you did it intentionally *shrugs*) Actually from this point on, you can add anything else you'd like!
The only other thing you need to do now is save the 3 Santa Ball layers in psp7 form and bring it up into AS. I set my speed at 11 and applied an opaque white background there before cropping and saving.
Please link only to this tutorial. You may save a personal copy to your own computer, but do NOT pass it on. Please give out a link back to this site to others who might want to try it. Any resemblance to any other tutorial similar to this is purely coincidental.
This tutorial was written on the November 17, 2007 ©MaMaK