
We will be using the Effects/Artists Effects/Balls and bubbles for the highlights on the body. You'll need to download these from HERE and put them in their appropriate folders in your My PsP Files folder (located under your My Documents...NOT...inside your PsP program). We will be using the "tp_BigClear" one.
BALL
1. With your Material Pallet set both fore/backgrounds to #051890 select your Ellipse Tool/Circle and draw out a circle the size you want:
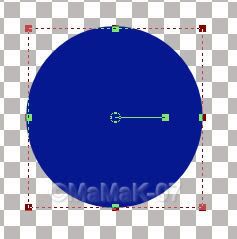
2. Right click on canvas and Apply.
3. Then go UP to Objects/Align/Center. Next go over to your layer pallet and right click on the vector and choose "Convert to raster layer".
4. Get your Magic Wand tool, click outside the blue circle and go UP to Selections and Invert. You will have the little marching ants around your circle. We need to do this so that the Effects will know in what dimension you want them applied.
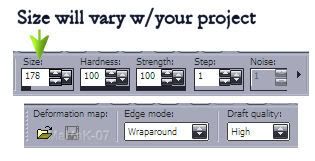
5. We will apply the highlights effects by going UP to Effects/Artists Effects/Balls and Bubbles. The option screen will pop up and at the very top, click the Presets: drop-down button and find and choose "tp_BigClear".
a. The first of the 4 tabs is Shape and tick off "Single ball or bubble" and "Maximum possible size":
b. Next tab is Surface and your settings are:
c. Maps is next and we won't be using the Bump or Envirnoments for this project. Make sure both options are NOT ticked off.
d. Now with your last tab, Illumination, selected, we are going to apply two different Lights to our Ladybug body.
Here are your 1st settings to put in Light 1:
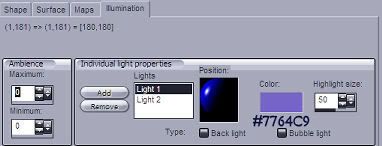
Color is: #7765c9
2. To change the position of the highlight, see below:
There is no position co-ordinates that I am aware of so you'll have to eye-ball it and use your best judgement. You can always back out of it and try again if you're not at first pleased with your results.
3. Next Light 2 settings:
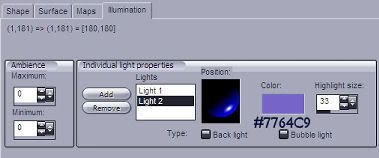
And this is the best example I can give you on where to place the 2nd highlight. Pull it down and to the right outside of the box. Look up at your option screen in the right hand panel and you can see how it's going to look.
Click OK
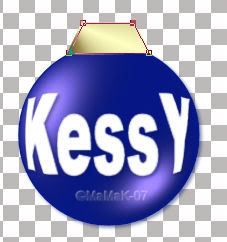
NAME
1. With the Material Pallet set w/both fore and background to white, get your Text Tool: Font/Arial Black and set to Vector Size 72. This is going to be way bigger than we want, but because it's in vector form, we can size it down with the deform that comes w/vector after we type the name.
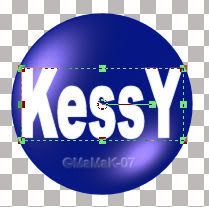
2. Size your name so that it is very close to the edges of your ball and go over to your Layer Pallet and right click on the vector name layer and convert to raster.
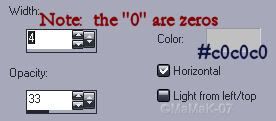
3. Now get your Warp Tool and use these settings:
set the size so that it is the same as the ball:
4. Now give it one good click. Not a little quick one, but not a real long one either. You'll see. If it doesn't look right on the first try, undo it and try again until you get what you want.

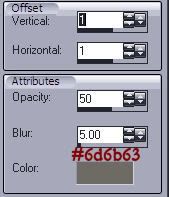
5. Now add a shadow to both the ball and your name with this color: #0a113c and these settings:
Vertical = 2, Horizonal = 2, Opacity = 50, Blur = .50
HANGER
We will build the hanger right on the ball canvas so we know how to size it correctly. Just be sure your "Create on Vector" is ticked as shown below.
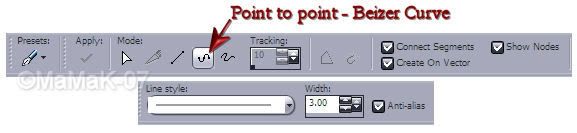
1. Get your Pen Tool and set it to:
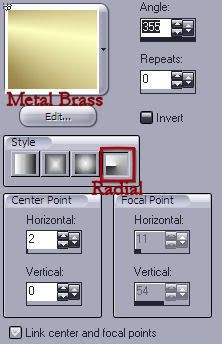
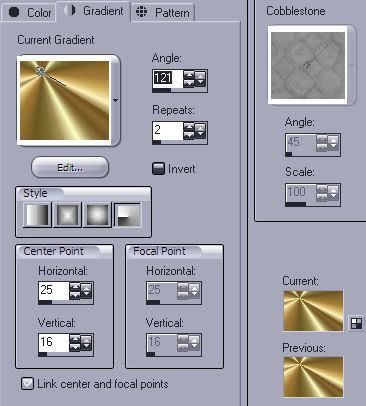
2. In your Material Pallet, bring up the Metal Brass gradient for both fore and backgrounds and use these settings:
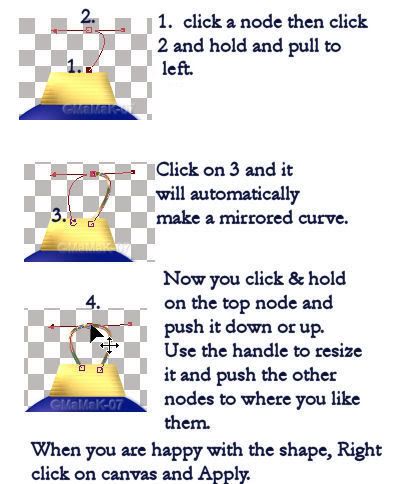
3. Now use the example below and start with 1. and click let go of cursor and then click on 2. etc. around to 5. where you click and let go to set the node. Then you click and hold on 5 and slide it down over 1. until you see "join" appear... let go.
4. Now you have a rectangle and you can click and hold on each node and push them in or out to size your hanger base just right over your ball. It should end up looking something like this:
5. Go over to your Layer Pallet and right click on the hanger vector layer and choose "convert to raster".
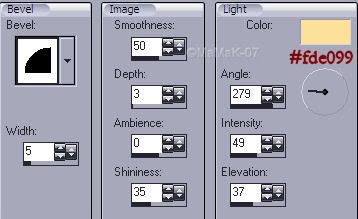
6. Now go UP to Effects/Textures/Blinds and apply these settings:
7. Now go UP to Effects/3D Effects/Inner Bevel and apply these settings:
8. Now apply this shadow:
HANGER RING
Go over to your Material Pallet use the same Metal Brass gradient, but make your background Null. Then apply these settings:
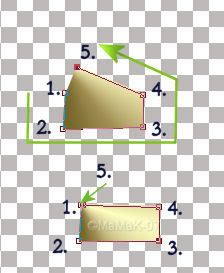
2. Get your Pen Tool set the same as was shown above except I used line width at 4. You can decide on the size width for yourself depending on the size of your hanger base.
3. For the next steps, I've made this example sheet:
4. Go over to your Layer Pallet and right click on your Ring layer and "convert to raster". Then apply the same Inner Bevel and Shadow as shown above for the Hanger Base.
5. In your Layer Pallet, pull up or down the layers until you have your Base over your ball and your ring under your base and all of them situated correctly. Then Merge Visible.
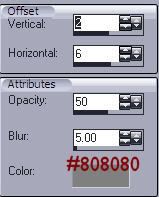
6. Now, if you desire, you can resize it to whatever you want. I resized mine 80%. And apply this shadow:
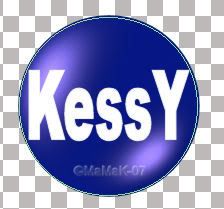
You can, of course, add any other elements you would like to the basic ball, but this TuT...we're done!
No comments:
Post a Comment